Home of the Plackyhacker
By writing custom shellcode, as exploit developers we gain fine-grained control over the exploitation process, allowing us to optimise payloads for target systems, evade mitigation mechanisms, and achieve our desired objectives.
This level of customisation enables the creation of more effective and sophisticated exploits, enhancing the understanding of vulnerability exploitation techniques.
This 3 part series will take you through the fundamental topics to help you write your own custom shellcode.
If you have worked with 32-bit shellcode you should be familiar with debugging shellcode, if not here's a very quick primer.
You will need a compiler; I use the Netwide Assembler. I use version 2.16.01 and this can be downloaded here.
I use two batch files, one to compile into an executable for debugging, and one to compile the final shellcode. The first is shown below:
del shellcode.obj
del shellcode.exe
nasm -f win64 shellcode.asm -o shellcode.obj
link /ENTRY:main /MACHINE:X64 /NODEFAULTLIB /SUBSYSTEM:CONSOLE shellcode.obj
The second batch file is used to compile shellcode into a raw .bin file.
nasm -f bin -o shellcode.bin shellcode.asm
Hex2.exe .\shellcode.bin
The sharp-eyed will notice that the batch file also runs an executable called Hex2.exe.
Like all other tools and workflows this is completely optional. There are plenty of hex viewers out there but I wrote my own in C#:
    static void Main(string[] args)
{
    byte[] file = System.IO.File.ReadAllBytes(args[0]);

    StringBuilder sb = new StringBuilder();
    sb.Append("const unsigned char shellcode[] = {");

    string hex = BitConverter.ToString(file).Replace("-", ", 0x");
    hex = "0x" + hex;

    sb.Append(hex);
    sb.Append("};");

    Console.WriteLine(sb.ToString());
 }
The image below shows the output, which can easily be copied and pasted into C code:

OK, now on to the good stuff!
Position independent shellcode refers to executable code that can be loaded and executed from any memory location, independent of its absolute address, making it highly flexible and resilient.
If you have written 32-bit shellcode for use in an exploit then you will be very familiar with position-independent code (PIC).
PIC is designed to be relocatable, meaning it does not contain any absolute memory addresses or offsets that would tie it to a specific location. Instead, it utilises relative addressing and runtime calculations to access data and functions within the code.
Various innovative techniques can be employed to circumvent the use of NULL bytes while preserving position independence in shellcode. This section will present some, but this is not an exhaustive study.
The jmp (jump) instruction is used to transfer control of the program execution to a different location in code. It allows for unconditional branching to a specified destination address, for example after a cmp instruction.
The jmp instruction is commonly used for implementing loops, conditional statements, function calls, but its can be a useful instruction for handling general program flow, and avoiding NULL bytes.
In 64-bit shellcode the jmp instruction can make relative jumps to alter instruction flow. If we look at this meaningless 64-bit assembly below we can see that shorter jumps do not cause us any issue:
            main:
  xor rax, rax         ;
  push rax             ;
  jmp sub1             ; this is the short jump - eb 04 (NO NULL BYTES)
  xor rax, rax         ;
  push rax             ;
sub1:
  xor rax, rax         ;
  push rax             ;
The short jump is compiled into eb 04.
However, if we want to make a longer jump this introduces NULL bytes, for example a jump of 204 is represented by the instruction: e9 cc 00 00 00.
In some circumstances it might be ok to have NULL bytes, for example in some local privilege escalation scenarios. When developing remote exploits more often than not NULL bytes will terminate our buffer and they should be avoided along with any other 'bad characters' (these are discussed later).
If we jump backwards then we also avoid NULL bytes because we are making a negative relative jump.
We can sometimes make a series of short jumps to control the flow of our assembly instructions and avoid NULL bytes. The graphic below depicts different types of jumps (the red numbers indicate NULL bytes):

Whilst the jmp instruction is good for unconditional branching and non-structured control flow, it is not appropriate for function calls.
The call instruction in x86 assembly language is used to call a subroutine or function.
It transfers control to the specified subroutine and saves the return address on the stack,
allowing for a subsequent ret (return) instruction to return execution back to the original calling location.
It enables the reuse of code and helps manage program flow by encapsulating specific functionality into self-contained units.
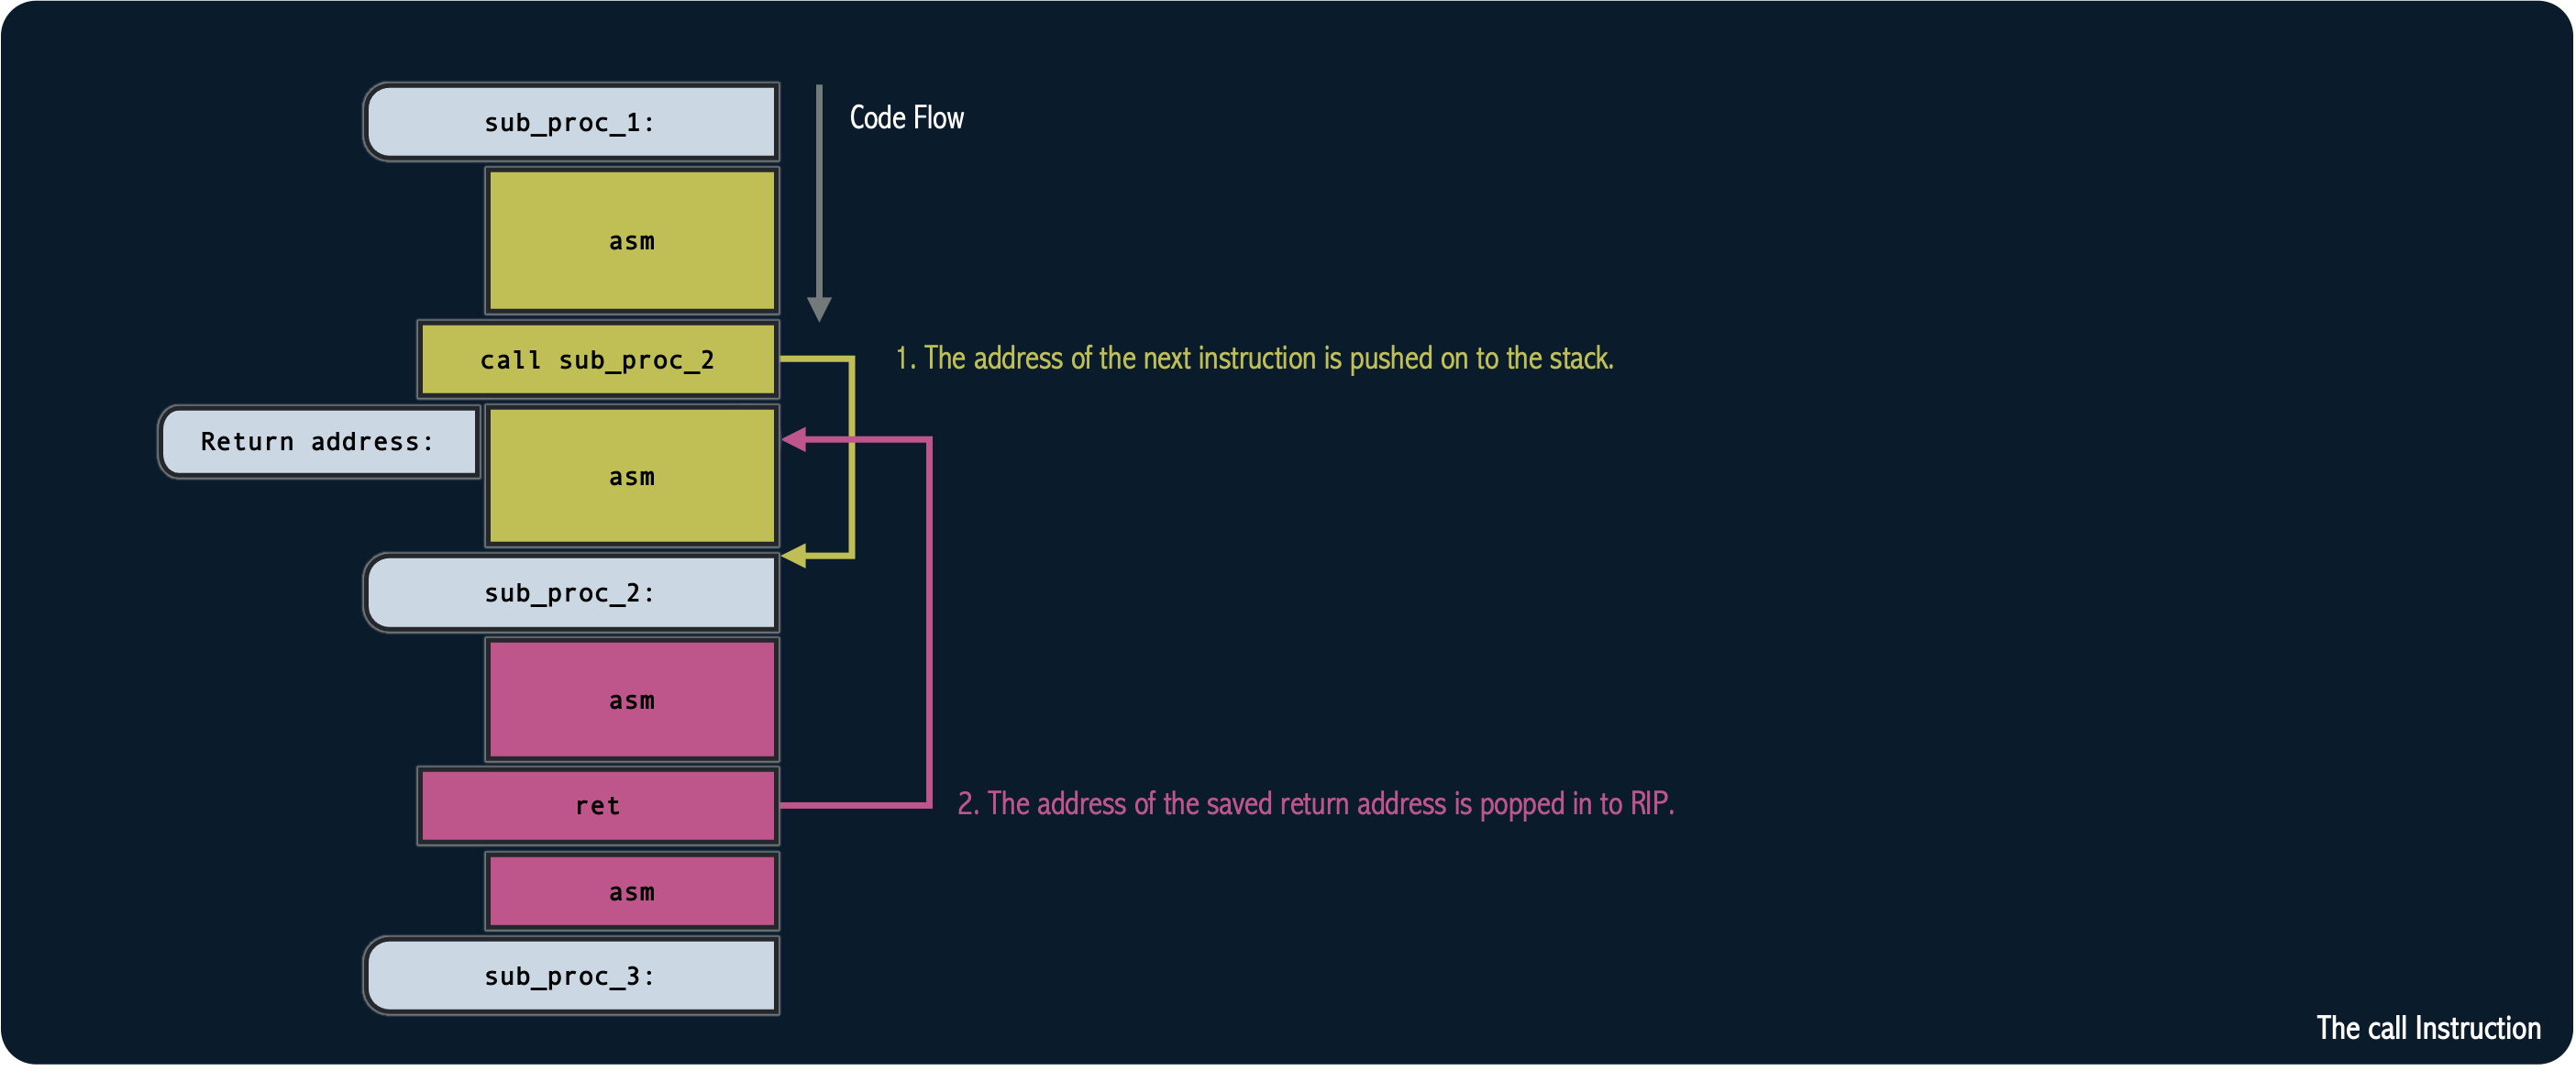
Interestingly, we can use the call instruction to get a pointer to a function by not executing the ret instruction and
popping the saved return address on the stack to a general purpose register instead:
            my_func_pis:
  jmp my_func_get_addr        ; make a short jump to get the function address
my_func_ret:
  pop r15                     ; here we can save the address of my_function in
                              ; r15 for use later (or we can save on the stack)
  jmp somewhere_else          ; continue code execution
my_func_get_addr:
  call my_func_ret            ; when this instruction is called, the address of
                              ; my_function is pushed on the stack
my_function:
  xor rax, rax                ; function starts here
                              ; ...
Now whenever we want to call this function we can simply use a call r15 instruction,
this avoids NULL bytes in our calls because it uses a pointer to the function address instead of a relative call.
A flow diagram is shown below to demonstrate this:

An alternative approach to obtain the function address and avoid NULL bytes involves leveraging the following creative technique:
            get_function_address:
  lea r15, [rel get_function + 0x41414141]    ; load the function address in to R15
                                              ; with a large offset to avoid NULL bytes
  sub r15, 0x41414141                         ; SUB the offset, this leaves the function
                                              ; address in r15
  jmp somewhere_else                          ;
get_function:
  xor rax, rax                                ; function starts here
                                              ; ...
There are many techniques in which to generate NULL-free position-independent shellcode but these do not help us when we need to call Win32 functions. When our shellcode is injected in to memory we do not know the address of the functions we need to call, we don't even know the base addresses of the modules in which the function calls are made.
In order to locate and access essential functions within Windows, we must first locate the kernel32.dll module, as it is an entry point for resolving function addresses and loading other modules.
When dealing with custom shellcode, it is essential to resolve the addresses of Win32 functions provided by kernel32.dll and others.
By obtaining the base address of kernel32.dll and resolving the addresses of specific functions, the shellcode gains the ability to directly invoke these functions.
The LoadLibraryA function is part of the kernel32.dll module. This function is used to load in other modules as we require them.
This section describes a method for finding the base address of kernel32.dll.
When a process is loaded into memory in the Windows operating system, the system ensures that essential system libraries,
such as ntdll.dll and kernel32.dll, are also loaded into the virtual memory space of the process.
These libraries contain a variety of important functions and services that the process may rely on for its execution and
interaction with the operating system.
By loading these libraries into the process's memory, the process gains
access to their functionality, allowing it to make use of Win32 APIs, system calls, and other system services.
Leveraging the consistent loading order of these modules, we can exploit this behavior to determine the base address of
kernel32.dll. This module is always loaded third following the application PE and ntdll.dll.
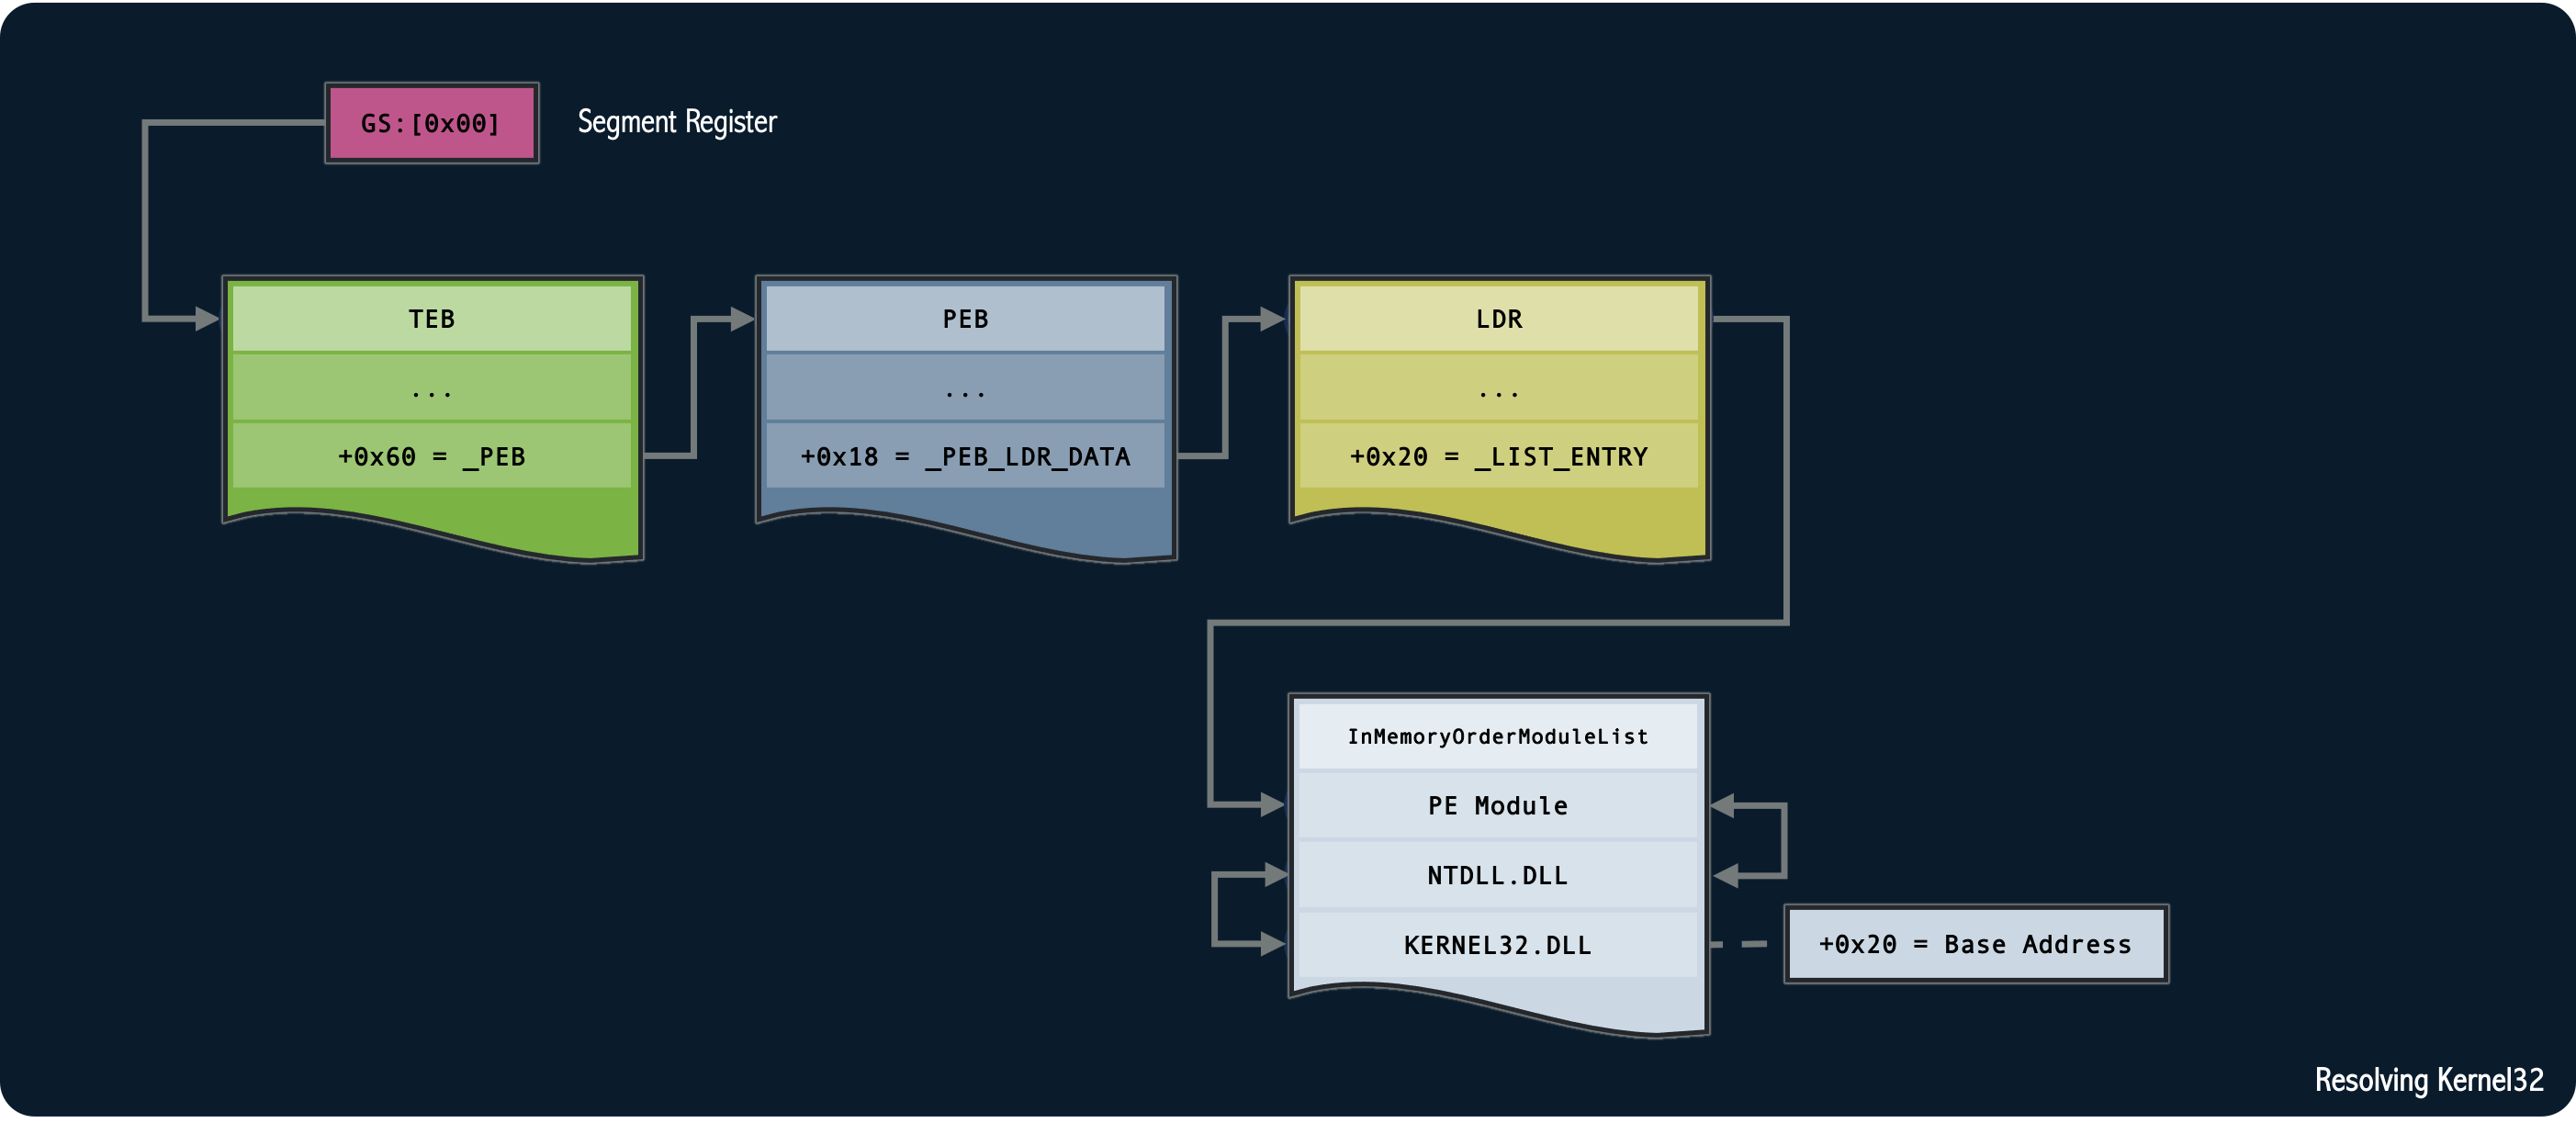
The gs register holds a reference to the current thread's Thread Environment Block (TEB).
We can follow the offset in the TEB to get a reference to the Process Environment Block (PEB) and the offset in the PEB
to get a reference to the Loader (LDR).
The TEB is a data structure in Windows that is associated with each thread of execution in a process. Its purpose is to store thread-specific information and provide a mechanism for accessing that information. The TEB contains various fields and structures that hold data related to thread context, thread-local storage (TLS), exception handling, and other thread-specific information. It serves as a communication channel between the operating system and the thread, allowing the system to manage and track the state of individual threads within a process.
The TEB structure can be examined in Windbg using dt nt!_TEB. Use this to find offset 0x60:
        0:000> dt nt!_TEB
ntdll!_TEB
+0x000 NtTib            : _NT_TIB
+0x038 EnvironmentPointer : Ptr64 Void
+0x040 ClientId         : _CLIENT_ID
+0x050 ActiveRpcHandle  : Ptr64 Void
+0x058 ThreadLocalStoragePointer : Ptr64 Void
+0x060 ProcessEnvironmentBlock : Ptr64 _PEB
...
The PEB is primarily used by the operating system for managing and controlling the execution of the process, such as loading and unloading modules, handling exceptions, managing process environment settings, and providing access to system resources. The process can also access certain fields in the PEB to retrieve information about itself or perform specific operations.
The PEB structure can be examined in Windbg using dt nt!_PEB. Use this to find offset 0x18:
        0:000> dt nt!_PEB
ntdll!_PEB
+0x000 InheritedAddressSpace : UChar
+0x001 ReadImageFileExecOptions : UChar
+0x002 BeingDebugged    : UChar
+0x003 BitField         : UChar
+0x003 ImageUsesLargePages : Pos 0, 1 Bit
+0x003 IsProtectedProcess : Pos 1, 1 Bit
+0x003 IsImageDynamicallyRelocated : Pos 2, 1 Bit
+0x003 SkipPatchingUser32Forwarders : Pos 3, 1 Bit
+0x003 IsPackagedProcess : Pos 4, 1 Bit
+0x003 IsAppContainer   : Pos 5, 1 Bit
+0x003 IsProtectedProcessLight : Pos 6, 1 Bit
+0x003 IsLongPathAwareProcess : Pos 7, 1 Bit
+0x004 Padding0         : [4] UChar
+0x008 Mutant           : Ptr64 Void
+0x010 ImageBaseAddress : Ptr64 Void
+0x018 Ldr              : Ptr64 _PEB_LDR_DATA
...
The LDR is a component of the PEB in Windows. It is a data structure that maintains information about the loaded modules in a process.
The LDR keeps track of the loaded modules and their associated information, such as the module's base address, entry point, module name, dependencies, and other attributes. It forms a linked list of entries, where each entry represents a loaded module in the process.
By observing the consistent order of module loading, with the third loaded module always being kernel32.dll,
we can enumerate the InMemoryOrderModuleList to locate the base address of kernel32.dll.
The commented assembly is shown below:
        find_kernel32:
  xor  rcx, rcx                ; RCX = 0
  mov  rax, [gs:rcx + 0x60]    ; RAX = _PEB
  mov  rax, [rax + 0x18]       ; RAX = _PEB->_PEB_LDR_DATA
  mov  rsi, [rax + 0x20].      ; RSI =
                               ; _PEB->_PEB_LDR_DATA->InMemoryOrderModuleList
  lodsq                        ; RAX = Second Module (NTDLL)
  xchg rax, rsi                ; RAX = RSI, RSI = RAX
  lodsq                        ; RAX = Third Module (KERNEL32)
  mov rbx, [rax + 0x20]        ; RBX = Base address of KERNEL32
Now that we have examined the process of enumerating the relevant structures starting from the PEB,
the shellcode should become self-explanatory.
One instruction that you may encounter for the first time is lodsq, which loads the QWORD at the address
pointed by rsi into rax and increments rsi by 8 bytes (QWORD).
We have a reference to the base address of kernel32.dll from which we can now resolve function addresses.